Django AWS EC2 Nginx Gunicorn (ตอน 2)
ขั้นตอนการ Deploy Django Project ไปวาง บน AWS EC2 โดยใช้ Nginx เป็น Web Server โดยทำงานร่วมกับ Gunicorn และเก็บ Static files บน Cloudinary

ขั้นตอนการ Deploy Django (ครอบคลุมเวอร์ชั่น 5.0) Project ไปวาง บน AWS EC2 โดยใช้ Nginx เป็น Web Server โดยทำงานร่วมกับ Gunicorn และเก็บ Static files บน Cloudinary ตอนที่ 2
แก้ไขไฟล์ตามนี้
django_auth/urls.py
from django.contrib import admin
from django.urls import path, include

urlpatterns = [
    path("admin/", admin.site.urls),
    path("api/", include("djoser.urls")),
    path("api/", include("users.urls")),
]
users/models.py
สร้างรูปแบบฐานข้อมูลให้กับ User
from django.db import models
from django.contrib.auth.models import (
    BaseUserManager,
    AbstractBaseUser,
    PermissionsMixin,
)


class UserAccountManager(BaseUserManager):
    def create_user(self, email, password=None, **kwargs):
        if not email:
            raise ValueError("โปรดใส่อีเมลด้วยค่ะ")

        email = self.normalize_email(email)
        email = email.lower()

        user = self.model(email=email, **kwargs)

        user.set_password(password)
        user.save(using=self._db)
        return user

    def create_superuser(self, email, password=None, **kwargs):
        user = self.create_user(
            email,
            password=password,
            **kwargs
        )
        user.is_staff = True
        user.is_superuser = True
        user.save(using=self._db)
        return user


class UserAccount(AbstractBaseUser, PermissionsMixin):
    first_name = models.CharField(max_length=255)
    last_name = models.CharField(max_length=255)
    email = models.EmailField(
        max_length=255,
        unique=True,
    )
    is_active = models.BooleanField(default=True)
    is_staff = models.BooleanField(default=False)
    is_superuser = models.BooleanField(default=False)

    objects = UserAccountManager()

    USERNAME_FIELD = "email"
    REQUIRED_FIELDS = ["first_name", "last_name"]

    def __str__(self):
        return self.email
users/authentication.py
customize Django REST framework simple jwt
from django.conf import settings
from rest_framework_simplejwt.authentication import JWTAuthentication


class CustomJWTAuthentication(JWTAuthentication):
    def authenticate(self, request):
        try:
            header = self.get_header(request)
            if header is None:
                raw_token = request.COOKIES.get(settings.AUTH_COOKIE)
            else:
                raw_token = self.get_raw_token(header)

            if raw_token is None:
                return None
            validated_token = self.get_validated_token(raw_token)

            return self.get_user(validated_token), validated_token
        except Exception:
            return None
users/views.py
from django.conf import settings
from rest_framework.views import APIView
from rest_framework.response import Response
from rest_framework import status
from djoser.social.views import ProviderAuthView
from rest_framework_simplejwt.views import (
    TokenObtainPairView,
    TokenRefreshView,
    TokenVerifyView,
)


class CustomProviderAuthView(ProviderAuthView):
    def post(self, request, *args, **kwargs):
        response = super().post(request, *args, **kwargs)

        if response.status_code == 201:
            access_token = response.data.get("access")
            refresh_token = response.data.get("refresh")

            response.set_cookie(
                "access",
                access_token,
                max_age=settings.AUTH_COOKIE_ACCESS_MAX_AGE,
                path=settings.AUTH_COOKIE_PATH,
                secure=settings.AUTH_COOKIE_SECURE,
                httponly=settings.AUTH_COOKIE_HTTP_ONLY,
                samesite=settings.AUTH_COOKIE_SAMESITE,
            )

            response.set_cookie(
                "refresh",
                refresh_token,
                max_age=settings.AUTH_COOKIE_REFRESH_MAX_AGE,
                path=settings.AUTH_COOKIE_PATH,
                secure=settings.AUTH_COOKIE_SECURE,
                httponly=settings.AUTH_COOKIE_HTTP_ONLY,
                samesite=settings.AUTH_COOKIE_SAMESITE,
            )

        return response


class CustomTokenObtainPairView(TokenObtainPairView):
    def post(self, request, *args, **kwargs):
        response = super().post(request, *args, **kwargs)

        if response.status_code == 200:
            access_token = response.data.get("access")
            refresh_token = response.data.get("refresh")

            response.set_cookie(
                "access",
                access_token,
                max_age=settings.AUTH_COOKIE_ACCESS_MAX_AGE,
                path=settings.AUTH_COOKIE_PATH,
                secure=settings.AUTH_COOKIE_SECURE,
                httponly=settings.AUTH_COOKIE_HTTP_ONLY,
                samesite=settings.AUTH_COOKIE_SAMESITE,
            )

            response.set_cookie(
                "refresh",
                refresh_token,
                max_age=settings.AUTH_COOKIE_REFRESH_MAX_AGE,
                path=settings.AUTH_COOKIE_PATH,
                secure=settings.AUTH_COOKIE_SECURE,
                httponly=settings.AUTH_COOKIE_HTTP_ONLY,
                samesite=settings.AUTH_COOKIE_SAMESITE,
            )
        return response


class CustomTokenRefreshView(TokenRefreshView):
    def post(self, request, *args, **kwargs):
        refresh_token = request.COOKIES.get("refresh")

        if refresh_token:
            request.data["refresh"] = refresh_token

        response = super().post(request, *args, **kwargs)

        if response.status_code == 200:
            access_token = response.data.get("access")

            response.set_cookie(
                "access",
                access_token,
                max_age=settings.AUTH_COOKIE_ACCESS_MAX_AGE,
                path=settings.AUTH_COOKIE_PATH,
                secure=settings.AUTH_COOKIE_SECURE,
                httponly=settings.AUTH_COOKIE_HTTP_ONLY,
                samesite=settings.AUTH_COOKIE_SAMESITE,
            )

        return response


class CustomTokenVerifyView(TokenVerifyView):
    def post(self, request, *args, **kwargs):
        access_token = request.COOKIES.get("access")
        if access_token:
            request.data["token"] = access_token

        return super().post(request, *args, **kwargs)


class LogoutView(APIView):
    def post(self, request, *args, **kwargs):
        response = Response(status=status.HTTP_204_NO_CONTENT)
        response.delete_cookie("access")
        response.delete_cookie("refresh")

        return response
users/urls.py
urls ทั้งหมดที่ใช้กับการ Login / Logout
from django.urls import path, re_path
from .views import (
    CustomProviderAuthView,
    CustomTokenObtainPairView,
    CustomTokenRefreshView,
    CustomTokenVerifyView,
    LogoutView,
)

urlpatterns = [
    re_path(
        r"^o/(?P<provider>\S+)/$",
        CustomProviderAuthView.as_view(),
        name="provider-auth",
    ),
    path("jwt/create/", CustomTokenObtainPairView.as_view()),
    path("jwt/refresh/", CustomTokenRefreshView.as_view()),
    path("jwt/verify/", CustomTokenVerifyView.as_view()),
    path("logout/", LogoutView.as_view()),
]
Social Authentication
Google OAuth2
ในบทความนี้ครอบคลุมเฉพาะ การใช้งาน Django Static Files ร่วมกับ Cloudinary ดังนั้นยังไม่ลงรายละเอียดเรื่อง Authentication จึงขอข้ามไปก่อนครับ
Facebook OAuth2
โปรแกรม Django Auth ที่กล่าวถึงในบทความนี้ ตั้งใจจะให้เป็น ซีรี่ย์ ดังนั้นจะกล่าวถึงรายละเอียดการตั้งค่า Facebook OAuth2 ในบทความถัดไป
AWS SES
Django Auth ที่เรากำลังสร้างอยู่นี้ จะรับผิดชอบงานหลังบ้าน ส่วนใหญ่ หรือทั้งหมด (Back-End) เพื่อแบ่งเบาภาระการประมวลผลของ Front-End (NextJS)
ดังนั้นเมื่อลูกค้า หรือ User ขอลงทะเบียนเข้าใช้งานเว็บไซต์ (Front-End) ข้อมูลจะส่งมาประมวลผลที่ Django Auth ซึ่งเป็น Back-End และหนึ่งในนั้นคือการส่งอีเมลยืนยันตัวตนลูกค้า หรือ User ให้ติดตั้ง Package นี้เพิ่มเติมครับ
pip install django-ses
pip freeze > requirements.txt
วิธีสร้างอีเมล เพื่อทดสอบ AWS SES
ไปที่ AWS SES คนที่เข้าใช้งานครั้งแรกกดปุ่ม Get started

ป้อนที่อยู่อีเมล ใช้ Gmail ก็ได้ครับ คลิ๊ก Next

ขั้นตอนถัดมาระบบบังคับให้เราป้อน เราป้อน gmail.com ไปก่อนครับ คลิ๊ก Next

หน้าจอถัดไป กดปุ่ม Get Started
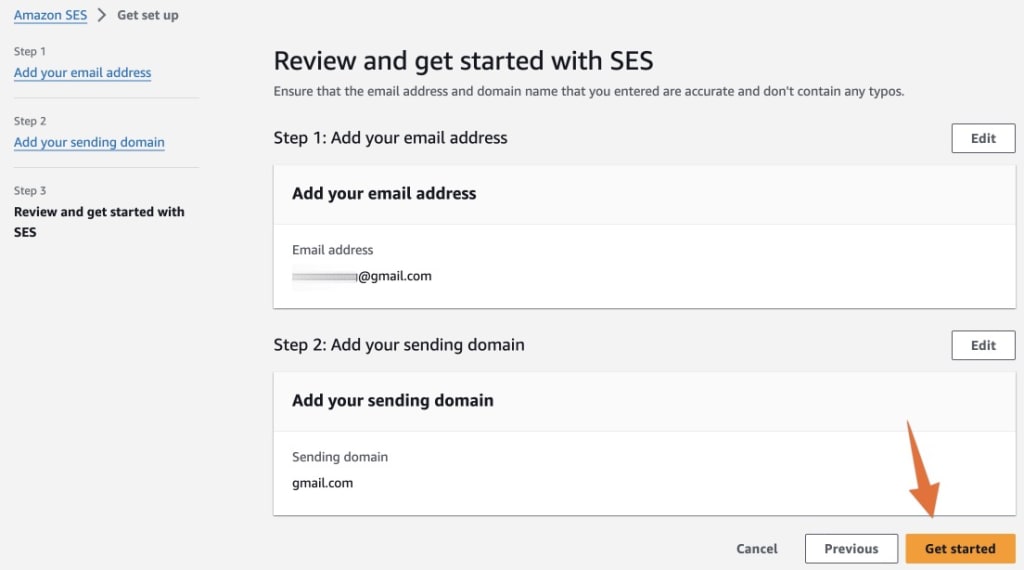
เสร็จแล้วครับ ตอนนี้ AWS SES จะส่งอีเมลไปยืนยันตัวตน ให้เปิดอีเมลที่ท่านระบุตามขั้นตอนด้านบน แล้วคลิ๊กลิงค์ ที่ AWS SES ส่งมา

ให้ทำซ้ำอีกครั้ง โดยเพิ่มอีก 1 อีเมล ไปที่ Verified identities แล้วกดปุ่ม Create identity

หน้าจอถัดไปให้เลือก Email address แล้วเติมอีเมลอันใหม่เข้าไป เสร็จแล้ว กดปุ่ม Create identity

SES SMTP Credential
ขั้นตอนต่อไปเราจะสร้าง SMTP Credential เมื่อไปที่หน้าจอ Amazon SES ตรง Sidebar ด้านซ้ายมือ คลิ๊ก SMTP settings แล้วเลือก Create SMTP credentials

ต่อไปให้เลือก Create user

ให้คัดลอก SMTP credentials ไว้ครับ หรือดาวน์โหลดไฟล์ มาเก็บไว้

ไปที่ไฟล์ .env.local คัดลอก SMTP Credentials ดังนี้ครับ
AWS_SES_ACCESS_KEY_ID="" # ตรงนี้ต้องแก้ ตามเลข 2
AWS_SES_SECRET_ACCESS_KEY="" # ตรงนี้ต้องแก้ ตามเลข 3

AWS_SES_FROM_EMAIL="your-email@gmail.com" # ตรงนี้ต้องแก้ ตามอีเมลที่เรากำหนดใน Verified identities ใช้ gmail ก็ได้ครับ
ไปที่ IAM คลิ๊กตรง User ที่เราเพิ่งสร้างซึ่งขึ้นต้นด้วย ses-smtp-user-xxxxxx

ตามด้วย Add permissions
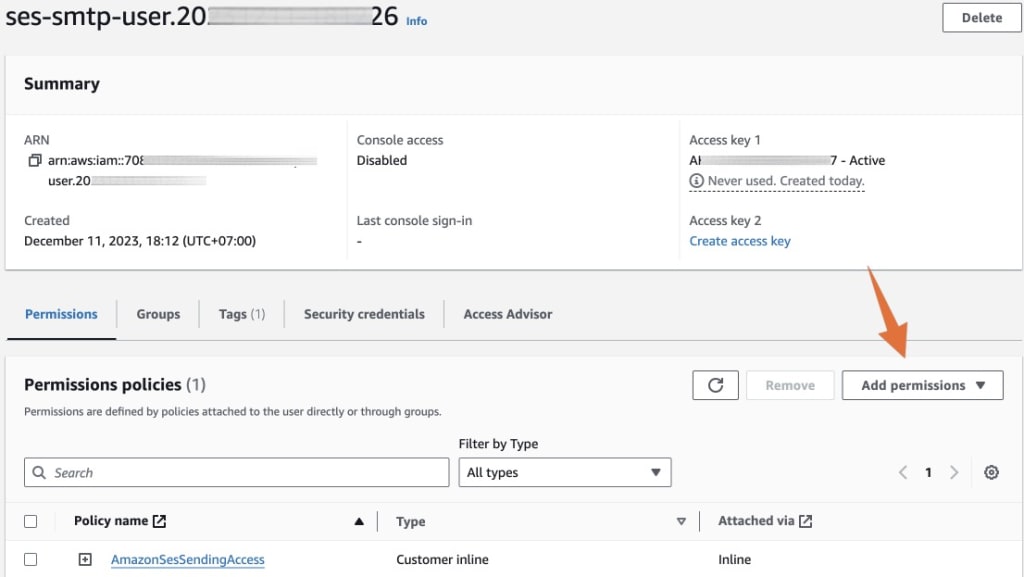
เมื่อคลิ๊กจะได้ Drop down list ให้เลือก Add permissions อีกครั้ง

เลือก Attach policies directly ค้นหาคำว่า SES เลือก AmazonSESReadOnlyAccess กดปุ่ม Next
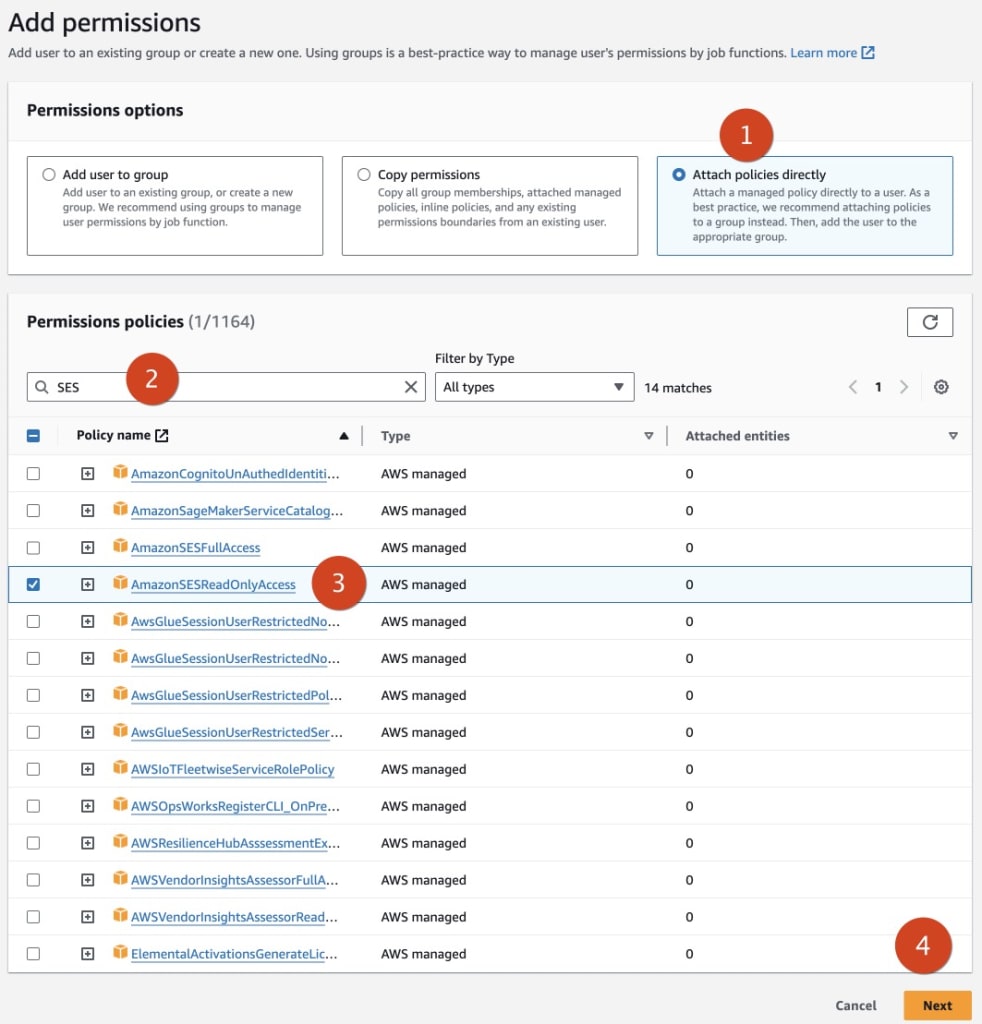
แล้วกดปุ่ม Add permissions

ตอนนี้เราจะมี 2 Policies ตามรูปด้านล่าง

เสร็จแล้วครับ สำหรับขั้นตอนการตั้งค่า AWS SES
Custom Domain Name
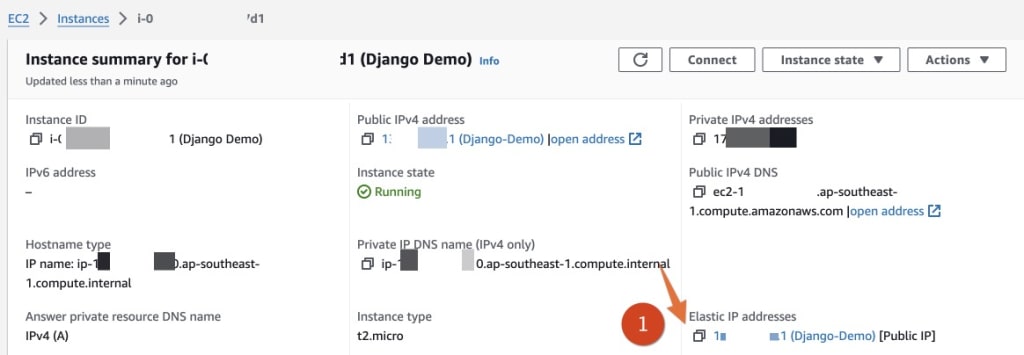
ต่อไปเราจะตั้งชื่อ โดเมน บน AWS Route 53 ให้ไปที่ EC2 คัดลอก IP Address ตรง Elastic IP addresses
ไปเปิดหน้าจอ AWS Route 53 เลือกชื่อโดเมนที่เราต้องการ แล้วกดปุ่ม Create record
เข้ามาที่หน้าจอ Create record ให้ใส่ชื่อ sub-domain เช่นเราต้องการสร้าง django-auth-api.example.com ก็ให้ใส่แค่ django-auth-api เลือก Record type เป็น A
ตรง Value ให้วางเลข IP Address ที่เราคัดลอกมาจาก EC2 เสร็จแล้วกดปุ่ม Create records

Development -> Production
เมื่อมาถึงขั้นตอนนี้เราสามารถ Run Django App ผ่านคำสั่ง
python manage.py runserver
และ Django App จะทำงานบนพอร์ต 8000 แต่อย่างไรก็ตามบทความนี้เราจะไม่ทดสอบบน Development นะครับ เราจะไปทดสอบทีเดียวบน Production ดังนั้นอย่าเพิ่งสั่ง runserver ครับ
Gunicorn
เนื่องจาก คำสั่ง gunicorn ต้องใช้ร่วมกับ package django แต่ django อยู่ใน Virtual Environment ดังนั้น แทนที่จะติดตั้ง Gunicorn บน Ubuntu ด้วยคำสั่ง
sudo apt-get install gunicorn
ผมขอเปลี่ยนมาติดตั้ง Gunicorn ใน Virtual Environment แทนแล้วกันครับ โดยตอนนี้ตรวจดูให้แน่ใจว่าเคอร์เซอร์ของเราอยู่ที่ Virtual Environdment แล้วรันคำสั่ง
pip install gunicorn
ลองใช้คำสั่ง which gunicorn เราจะพบว่า gunicorn อยู่ที่ env/bin
❯ which gunicorn
/home/django/django-auth/env/bin/gunicorn
systemd socket
ให้สร้างไฟล์ gunicorn.socket ด้วยคำสั่ง
sudo nano /etc/systemd/system/gunicorn.socket
คัดลอกโค้ดนี้เข้าไปได้เลยครับ ขั้นตอนนี้จะยังไม่มีอะไรครับ
[Unit]
Description=gunicorn socket

[Socket]
ListenStream=/run/gunicorn.sock

[Install]
WantedBy=sockets.target
สั่งบันทึกไฟล์ แล้วออกมาที่ Terminal
systemd service
สร้างอีกไฟล์ คู่กันครับ แต่รอบนี้จะเป็น gunicorn.service
sudo nano /etc/systemd/system/gunicorn.service
ไฟล์ gunicorn.service จะซับซ้อนกว่าไฟล์ gunicorn.socket นิดหน่อย ให้รันคำสั่ง
which gunicorn
จะได้คำตอบตามด้านล่างนี้ ให้เก็บคำตอบไว้ก่อนครับ
/home/django/django-auth/env/bin/gunicorn
เข้าไปที่ไฟล์ django_auth/settings.py
❯ pwd
/home/django/django-auth
❯ ls
django_auth  env  manage.py  requirements.txt  users
ค้นหาบรรทัดที่มีโค้ดนี้อยู่ครับ
WSGI_APPLICATION = "xxxx.wsgi.application"
ในที่นี้จะเป็น
WSGI_APPLICATION = "django_auth.wsgi.application"
เราได้ข้อมูลครบแล้ว ให้เปิดไฟล์ gunicorn.service ด้วยคำสั่ง
sudo nano /etc/systemd/system/gunicorn.service
คัดลอกโค้ดนี้เข้าไปครับ
[Unit]
Description=gunicorn daemon
Requires=gunicorn.socket
After=network.target

[Service]
User=<your-user>
Group=www-data
WorkingDirectory=<Project-Directory-Root>
Environment="PATH=/home/<your-user>/<your-project>/env/bin"
ExecStart=path-to-gunicorn \
          --access-logfile - \
          --workers 3 \
          --bind unix:/run/gunicorn.sock \
 <your-project>.wsgi:application

[Install]
WantedBy=multi-user.target
ซึ่งในกรณีนี้ หลังจากแก้ไขแล้ว จะได้
[Unit]
Description=gunicorn daemon
Requires=gunicorn.socket
After=network.target

[Service]
User=django
Group=www-data
WorkingDirectory=/home/django/django-auth
Environment="PATH=/home/django/django-auth/env/bin"
ExecStart=/home/django/django-auth/env/bin/gunicorn \
          --access-logfile - \
          --workers 3 \
          --bind unix:/run/gunicorn.sock \
 django_auth.wsgi:application

[Install]
WantedBy=multi-user.target
เสร็จแล้วให้แจ้ง Ubuntu ว่าเราจะใช้งาน Gunicorn ด้วย 3 คำสั่งนี้
sudo systemctl daemon-reload
sudo systemctl start gunicorn
sudo systemctl enable gunicorn
จะได้หน้าจอ Terminal ประมาณนี้
❯ sudo systemctl daemon-reload
❯ sudo systemctl start gunicorn
❯ sudo systemctl enable gunicorn
Created symlink /etc/systemd/system/multi-user.target.wants/gunicorn.service → /etc/systemd/system/gunicorn.service.
เสร็จแล้วลองเช็คว่ามี Error มั๊ย ด้วยคำสั่ง
sudo systemctl status gunicorn
ถ้ามี Error ให้ลองใช้คำสั่ง
sudo journalctl -u gunicorn
โดยปกติ Error มักเกิดจากมันหา gunicorn ไม่พบ ดังนั้นวิธีแก้เบื้องต้นคือต้องระบุ Path-to-gunicorn ในไฟล์ gunicorn.service ให้ถูกต้อง ซึ่งในกรณีของเรา เราจะเก็บไว้ใน env/bin
Restart Gunicorn
ทุกครั้งที่มีการแก้ไขไฟล์ ดังกล่าวข้างต้น ให้รีสตาร์ท gunicorn ด้วยคำสั่ง
sudo systemctl daemon-reload
sudo systemctl restart gunicorn
Nginx
เนื่องจาก Nginx ไม่ได้ใช้งาน Package บน Django จึงสามารถติดตั้งบน Ubuntu ได้เลยครับ ไม่ต้องติดตั้งใน Virtual Environment
sudo apt-get install nginx -y
sites-available
ให้สร้างไฟล์ <project-name> ในโฟลเดอร์ /etc/nginx/sites-available/
ด้วยคำสั่ง
sudo nano /etc/nginx/sites-available/<project-name>
ในที่นี้จะเป็น django-auth
sudo nano /etc/nginx/sites-available/django-auth
คัดลอกโค้ดนี้เข้าไปวางครับ
server {
    listen 80;
    server_name server_domain_or_IP;

    location = /favicon.ico { access_log off; log_not_found off; }
    location /static/ {
        root /home/<your-user>/<your-project>;
    }

    location / {
        include proxy_params;
        proxy_pass http://unix:/run/gunicorn.sock;
    }
}
ให้สังเกตว่า proxy_pass ตรงบรรทัดสุดท้าย คือ url ที่เรากำหนดในไฟล์ gunicorn.socket
[Socket]
ListenStream=/run/gunicorn.sock
เมื่อแก้ไขไฟล์ให้ตรงกับข้อมูลของเรา จะได้โค้ดใหม่ดังนี้
server {
    listen 80;
    server_name staging-auth-api.example.com;

    location = /favicon.ico { access_log off; log_not_found off; }
    location /static/ {
        root /home/django/django-auth;
    }

    location / {
        include proxy_params;
        proxy_pass http://unix:/run/gunicorn.sock;
    }
}
sites-enabled
ให้คัดลอกลิงค์จาก sites-available ไปที่ sites-enabled
sudo ln -s /etc/nginx/sites-available/django-auth /etc/nginx/sites-enabled/
ถ้าเข้าไปดูในโฟลเดอร์ /etc/nginx/sites-enabled/ จะพบไฟล์ django-auth และมีรายละเอียดข้างในเหมือนกัน
ทดสอบ nginx
ให้ทดสอบว่าโค้ด ที่เราเขียนใน Nginx ถูกต้องมั๊ย
sudo nginx -t
เปิดพอร์ตให้ nginx
เราจะเปิดพอร์ตบน Ubuntu ให้ Nginx ด้วยคำสั่ง
sudo ufw allow 'Nginx Full'
เสร็จแล้วครับ ตอนนี้เราได้ Deploy Django บน AWS EC2 และ Nginx เรียบร้อยแล้ว
run คำสั่ง Django 3 คำสั่ง
ตอนนี้เราสามารถรันคำสั่ง Django ทั้ง 3 คำสั่งสำคัญได้แล้ว เพื่อทดสอบว่ามันสามารถทำงานบน Production Environment และไม่มี Error
python manage.py makemigrations
python manage.py migrate
python manage.py runserver
ถ้าหน้าจอ Terminal แสดงผลแบบนี้ แสดงว่าผ่าน ไม่มี Error ใดๆ
❯ python manage.py makemigrations
/home/django/django-auth
False
Migrations for 'users':
  users/migrations/0001_initial.py
    - Create model UserAccount
ลองสั่ง migrate
❯ python manage.py migrate
/home/django/django-auth
False
Operations to perform:
  Apply all migrations: admin, auth, contenttypes, django_ses, sessions, social_django, users
Running migrations:
  Applying contenttypes.0001_initial... OK
  Applying contenttypes.0002_remove_content_type_name... OK
  Applying auth.0001_initial... OK
  Applying auth.0002_alter_permission_name_max_length... OK
  Applying auth.0003_alter_user_email_max_length... OK
  Applying auth.0004_alter_user_username_opts... OK
  Applying auth.0005_alter_user_last_login_null... OK
  Applying auth.0006_require_contenttypes_0002... OK
  Applying auth.0007_alter_validators_add_error_messages... OK
  Applying auth.0008_alter_user_username_max_length... OK
  Applying auth.0009_alter_user_last_name_max_length... OK
  Applying auth.0010_alter_group_name_max_length... OK
  Applying auth.0011_update_proxy_permissions... OK
  Applying auth.0012_alter_user_first_name_max_length... OK
  Applying users.0001_initial... OK
  Applying admin.0001_initial... OK
  Applying admin.0002_logentry_remove_auto_add... OK
  Applying admin.0003_logentry_add_action_flag_choices... OK
  Applying django_ses.0001_initial... OK
  Applying sessions.0001_initial... OK
  Applying social_django.0001_initial... OK
  Applying social_django.0002_add_related_name... OK
  Applying social_django.0003_alter_email_max_length... OK
  Applying social_django.0004_auto_20160423_0400... OK
  Applying social_django.0005_auto_20160727_2333... OK
  Applying social_django.0006_partial... OK
  Applying social_django.0007_code_timestamp... OK
  Applying social_django.0008_partial_timestamp... OK
  Applying social_django.0009_auto_20191118_0520... OK
  Applying social_django.0010_uid_db_index... OK
  Applying social_django.0011_alter_id_fields... OK
  Applying social_django.0012_usersocialauth_extra_data_new... OK
  Applying social_django.0013_migrate_extra_data... OK
  Applying social_django.0014_remove_usersocialauth_extra_data... OK
  Applying social_django.0015_rename_extra_data_new_usersocialauth_extra_data... OK
ขั้นตอน migrate ผ่านทั้งหมดครับ ขั้นตอนที่ 3 สั่ง runserver ลองดูครับ
❯ python manage.py runserver
/home/django/django-auth
False
/home/django/django-auth
False
Performing system checks...

System check identified no issues (0 silenced).
December 12, 2023 - 13:03:27
Django version 5.0, using settings 'django_auth.settings'
Starting development server at http://127.0.0.1:8000/
Quit the server with CONTROL-C.
เนื่องจาก Django App ของเราทำงานเป็น Back-End ดังนั้นมันยังไม่มี root url หรือ Home page (http://yourdomain.com)ให้เข้าไปที่ http://yourdomain.com/admin นะครับ เพื่อทดสอบ ตามรูปด้านล่าง
แบบนี้ถือว่าผ่านครับ แต่ให้สังเกตว่ามี 2 จุดที่ยังไม่เรียบร้อย
-
ไฟล์ css ยังไม่ทำงาน
-
เว็บไซต์ของเราขึ้น Not Secure

Collectstatic
เราจะไล่เก็บไฟล์ CSS และไฟล์ JS ทั้งหมด ไปเก็บไว้ที่ Cloudianry CDN เราเรียกกระบวนการนี้ว่า Collectstatic
ให้ไปที่โฟลเดอร์ราก (มีไฟล์ manage.py) ตรวจดูให้แน่ใจว่า Virtual Environment Active อยู่ แล้วใช้คำสั่ง
python manage.py collectstatic
นั่งรอซักครู่ไฟล์ static (css, js) กำลัง Sync ไปที่ Cloudinary
เมื่อเสร็จแล้วไปที่ Cloudinary -> Media Library -> Folders
เราจะเห็นโฟลเดอร์ static อยู่ตรงนั้น

เมื่อคลิ๊กเข้าไปจะพบ 3 โฟลเดอร์ 1 ไฟล์

ลอง รีเฟรซ หน้าจอดูครับ ตอนนี้ไฟล์ CSS ทำงานแล้วครับ ถ้าตรวจสอบดู ไฟล์ CSS จะถูกเก็บไว้ที่ Cloudinary CDN -> https://res.cloudinary.com/xxxxx/raw/upload/v1/static/

enable HTTPS ด้วย Certbot
เหลือขั้นตอนสุดท้ายแล้วครับ คือการเพิ่มความปลอดภัยให้กับเว็บไซต์ของเราด้วย SSL หรือที่เราคุ้นเคยในรูป HTTPS โปรโตคอล
ก่อนอื่นให้ติดตั้ง certbot ก่อนครับ
sudo apt-get install certbot python3-certbot-nginx -y
เสร็จแล้วก็รันคำสั่งด้านล่างนี้ได้เลย
sudo certbot --nginx
จะมีคำถาม 3 คำถาม ดังนี้ครับ
-
Email Address -> ให้ใส่ที่อยู่อีเมล
-
Consent for Terms of Service -> ให้ตอบ Y
-
Subscribe email -> ตอบ Y หรือ N ก็ได้ครับ
❯ sudo certbot --nginx
Saving debug log to /var/log/letsencrypt/letsencrypt.log
Enter email address (used for urgent renewal and security notices)
 (Enter 'c' to cancel): admin@example.com

- - - - - - - - - - - - - - - - - - - - - - - - - - - - - - - - - - - - - - - -
Please read the Terms of Service at
https://letsencrypt.org/documents/LE-SA-v1.3-September-21-2022.pdf. You must
agree in order to register with the ACME server. Do you agree?
- - - - - - - - - - - - - - - - - - - - - - - - - - - - - - - - - - - - - - - -
(Y)es/(N)o: Y

- - - - - - - - - - - - - - - - - - - - - - - - - - - - - - - - - - - - - - - -
Would you be willing, once your first certificate is successfully issued, to
share your email address with the Electronic Frontier Foundation, a founding
partner of the Let's Encrypt project and the non-profit organization that
develops Certbot? We'd like to send you email about our work encrypting the web,
EFF news, campaigns, and ways to support digital freedom.
- - - - - - - - - - - - - - - - - - - - - - - - - - - - - - - - - - - - - - - -
(Y)es/(N)o: N
Account registered.

Which names would you like to activate HTTPS for?
- - - - - - - - - - - - - - - - - - - - - - - - - - - - - - - - - - - - - - - -
1: staging-auth-api.example.com
- - - - - - - - - - - - - - - - - - - - - - - - - - - - - - - - - - - - - - - -
Select the appropriate numbers separated by commas and/or spaces, or leave input
blank to select all options shown (Enter 'c' to cancel):
Requesting a certificate for staging-auth-api.example.com

Successfully received certificate.
Certificate is saved at: /etc/letsencrypt/live/staging-auth-api.example.com/fullchain.pem
Key is saved at:         /etc/letsencrypt/live/staging-auth-api.example.com/privkey.pem
This certificate expires on 2024-03-11.
These files will be updated when the certificate renews.
Certbot has set up a scheduled task to automatically renew this certificate in the background.

Deploying certificate
Successfully deployed certificate for staging-auth-api.example.com to /etc/nginx/sites-enabled/django-auth
Congratulations! You have successfully enabled HTTPS on https://staging-auth-api.example.com

- - - - - - - - - - - - - - - - - - - - - - - - - - - - - - - - - - - - - - - -
If you like Certbot, please consider supporting our work by:
 * Donating to ISRG / Let's Encrypt:   https://letsencrypt.org/donate
 * Donating to EFF:                    https://eff.org/donate-le
- - - - - - - - - - - - - - - - - - - - - - - - - - - - - - - - - - - - - - - -
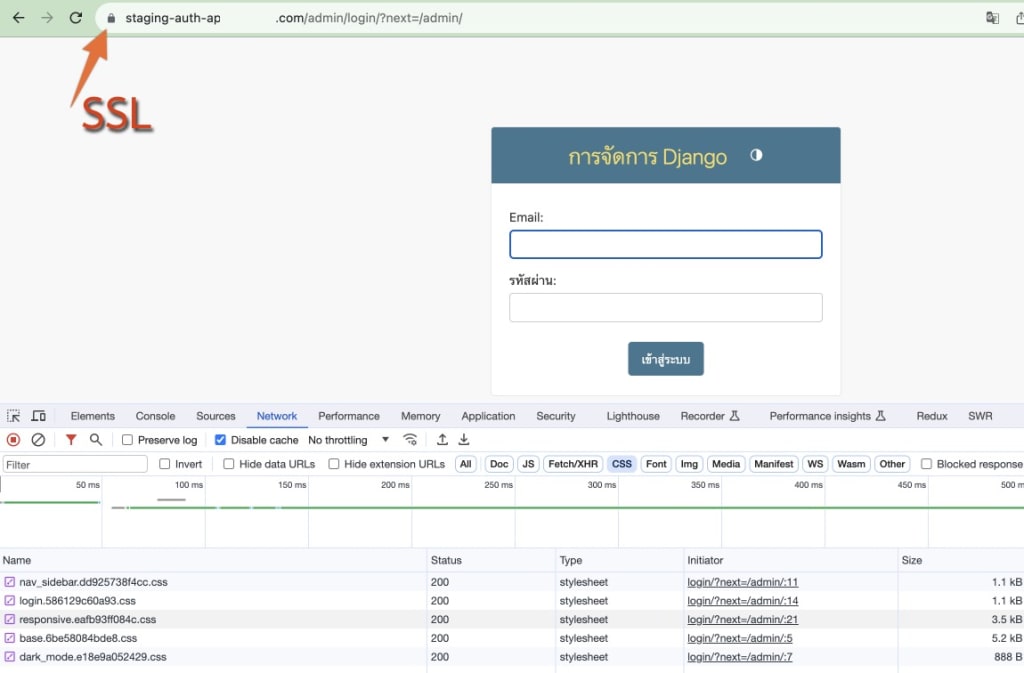
เมื่อกลับไปเว็บไซต์ของเรา ตอนนี้เราจะเห็นเครื่องหมายกุญแจ แสดงว่าเว็บไซต์มี SSL หรือ HTTPS เรียบร้อยแล้วครับ
สรุปการ Deploy Django บน EC2 Nginx
บทความนี้จะเน้นเรื่องการ Deployment Django Project เป็นหลัก โดยจะพูดถึงการตั้งค่าในส่วนต่างๆ เพื่อให้ Django App สามารถทำงานได้ แต่จะยังไม่พูดถึงว่ามันทำงานอย่างไร และทำอะไรได้บ้าง ซึ่งจะได้พูดถึงในบทความต่อไป
วิธีแก้ Certbot fail
ปัญหา: เมื่อขอ SSL ผ่านคำสั่ง sudo certbot --nginx แล้วไม่สำเร็จ ปัญหาน่าจะมาจาก DNS เช่น เราเพิ่งผูก Domain name กับ IP ซึ่งมันต้องใช้เวลาในการกระจายข้อมูลนี้ไปสู่โลกอินเตอร์เน็ต ดังนั้นตราบใดที่เลข IP ยังไม่ได้ชี้ไปที่ Domain name ของเรา ตัว Certbot ก็จะหา Domain name ของเราไม่เจอนั่นเอง การขอ Certificate สำหรับ SSL จึงไม่สำเร็จ
วิธีแก้: ให้เราเช็ค Domain name ด้วยเครื่องมือเหล่านี้ครับ
ถ้าขึ้นข้อความแบบนี้ ถือว่าผ่านครับ
All OK!
No issues were found with <your-domain>.com. If you are having problems with creating an SSL certificate, please visit the Let's Encrypt Community forums and post a question there.